Professional DevOps & GitOps Training for Career Growth
Professional DevOps & GitOps Training for Career Growth
End-to-End GitOps Implementation using Terraform and FluxCD
Table of Contents
- Introduction to GitOps and Infrastructure as Code
- Why Combine GitOps with Terraform and FluxCD
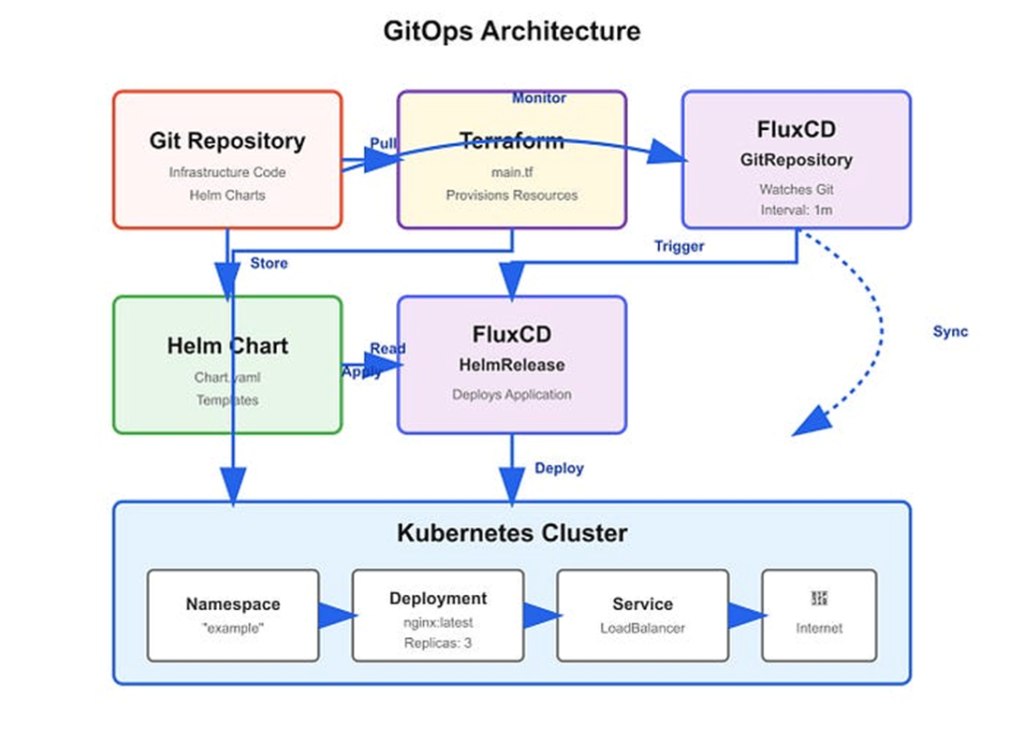
- Architecture Overview
- Prerequisites
- Implementing GitOps with Terraform and FluxCD
- Creating the Git Repository
- Defining Infrastructure with Terraform
- Initializing Terraform
- Applying the Terraform Configuration
- Application Packaging with Helm
- Creating the Helm Chart
- Packaging the Helm Chart
- Continuous Deployment with FluxCD
- Creating the FluxCD GitRepository Resource
- Creating the FluxCD HelmRelease Resource
- Applying FluxCD Resources
- Verifying the Deployment
- Best Practices for GitOps with Terraform and FluxCD
- Conclusion and Key Takeaways
Introduction
GitOps and Infrastructure as Code (IaC) are foundational practices within contemporary Platform Engineering. GitOps introduces a declarative operational model in which git repositories serve as theauthoritative source of truth for managing both infrastructure and application states. Infrastructure as code, in contrast, enables the provisioning and management of infrastructure through machine-readable, version-controlled definitions rather than manual configuration. This article examines the integration of GitOps with IaC utilizing Terraform for infrastructure provisioning and FluxCD for automated, continuous deployment.
Prerequisites
Before proceeding with the implementation, ensure that the following requirements are met:
- A functional kubernetes cluster running version 1.19 or later.
- Terraform is installed and properly configured on the local development environment.
- Helm installed on local machine for managing kubernetes packages.
- FluxCD install and configured within the kubernetes cluster
Click to view image in full size
Redis vs Traditional Databases: Feature Comparison
Implementing GitOps with Terraform and FluxCD
Step 1: Create a Git Repository
Begin by creating a new Git repository to store all infrastructure-related code and configuration files.This repository will function as the single source of truth for managing infrastructure state and application deployments in accordance with GitOps principle.
Step 2: Define Infrastructure Using Terraform
Terraform is an open-source Infrastructure as Code (IaC) tool that enables the declarative definition and managment of infrastructure resources.In this step, Terraform is used to describe the kubernetes cluster resources required for the platform.
Create a new directory called “terraform” in your Git repository and create a file named “main.tf” with the following content:
provider "kubernetes" {
host   = "https://${var.cluster_endpoint}"
token  = var.cluster_token
client_certificate   = base64decode(var.client_certificate)
client_key           = base64decode(var.client_key)
cluster_ca_certificate   = base64decode(var.cluster_ca_certificate)
}
resource "kubernetes_namespace" "example" {
     metadata {
          name = "example"
        }
     }
 resource "kubernetes_deployment" "example" {
     metadata {
             name = "example"
             namespace = kubernetes_namespace.example.metadata.0.name
               }
     spec {
        replicas = 3
        selector {
          match_labels = {
          App = "example"
            }
          }
        template {
          metadata {
            labels = {
               App = "example"
               }
             }
          spec {
            container {
               image = "nginx:latest"
               name = "example"
               port {
                 container_port = 80
                         }
                       }
                     }
                   }
                 }
               }
      resource "kubernetes_service" "example" {
          metadata {
            name = "example"
            namespace = kubernetes_namespace.example.metadata.0.name
             }
               spec {
                 selector = {
                   App = kubernetes_deployment.example.metadata.0.labels.App
                     }
                       port {
                         port = 80
                         target_port = 80
                          }
                           type = "loadbalancer"
                         }
                       }
This codes defines a kubernetes namespace, deployment, and service for a simple nginx application.
Step 3: Initialize Terraform
Initalize terraform by running the following command in the “terrafform” directory:
terraform initThis command downloads the necessary providers plugins and setup the backend for storing the Terraform state
Step 4: Apply the Terraform configuration
Apply the Terraform configuration by running the following command:
terraform apply -var-file=terraform.tfvarsThis command applies the infrastructure changes define in the “main.tf”
file.You will be prompted to enter the values for the variables define in the provider block.
Step 5: Create Helm Chart
Helm is a package manager for kubernetes that allow you to package your application and its dependencies into a single chart.In this step, we will create a Helm chart for our nginx application.
Create a new directory called “helm” in your git repository and create a file named “chart.yaml” with the following content:
apiversion: 2
name: example
version: 0.1.0
Create a new directory called “templates” in the “helm” directory and create a file named “deployment.yaml” with the following content:
apiVersion: apps/v1
kind: Deployment
metadata:
   name: example
   labels:
     app: example
 spec:
  replicas: 3
  selector:
    matchLabels:
     app: example
  template:
   metadata:
     labels:
       app:example
   spec:
     containers:
      - name: example
        image: nginx:latest
        ports:
          - containerPort: 80
Create a new file named “values.yaml”in the “helm” directory with the following content:
replicaCount: 3This Helm chart defines a kubernetes deployment for our Nginx application.
Step 6: Package the Helm chart
Package the helm chart by running following command:
helm package helm/this command creates a tarball file named “example-0.1.0.tgz” in the current directory.
Step 7: Create a FluxCD GitRepository resource
FluxCD is a GitOps tool that automates the deployment of applications and infrastructure to Kubernetes. In this step, we will create a FluxCD GitRepository resource that points to our Git repository.
Create a new file named “fluxcd.yaml” in your Git repository with the following content:
apiVersion: source.toolkit.fluxcd.io/v1betal
kind: GitRepository
metadata:
  name: example
spec:
  interval: 1m
  url: https://github.com/<username>/<repository>.git
  ref:
      branch: main
This FluxCD GitRepository resource points to our Git repository and specifies the branch to watch for changes.
Step 8: Create a FluxCD HelmRelease resource
Create a new file named “helmrelease.yaml” in your Git repository with the following content:
apiversion: helm.toolkit.fluxcd.io/v2betal
kind: HelmRelease
metadata:
   name: example
spec:
   chart:
name: example
version: "0.1.0"
repository: "./helm"
values:- values.yaml
This FluxCD HelmRelease resource specifies the Helm chart to deploy and the values to use
Step 9: Apply the FluxCD resources
Apply the FluxCD resources by running the following command:
kubectl apply -f fluxcd.yaml
kubectl apply -f helmrelease.yaml
This command creates the FluxCD GitRepository and HelmRelease resources in your Kubernetes cluster.
Step 10: Verify the deployment
Verify the deployment by running the following command:
kubectl get deployment -n exampleThis command lists the deployments in the “example” namespace. should see the “example” deployment with three replicas running.
Conclusion
This article examined the implementation of GitOps in conjunction with Infrastructure as Code (IaC) using Terraform and FluxCD. The infrastructure was defined declaratively through Terraform, while application deployment was managed via Helm charts and continuously reconciled using FluxCD. By adopting Git as the authoritative source of truth for both infrastructure and application configurations, this approach promotes consistency, reliability, and repeatability across multiple environments. Furthermore, the integration of GitOps and IaC enhances operational transparency, simplifies change management, and supports scalable platform engineering practices.
Written By Muhammad Arsalan